At the end of every day do you still dutifully close every file and
program window before shutting down your PC? That’s the standard way to
handle things, but for quite a few versions of Windows, Microsoft also
offered the ability to use Sleep and Hibernate modes instead of just a
regular shut down.
In Windows 10, however, Microsoft decided not to include hibernate with the rest of the shut down options under Start > Power by default. The good news is it’s easy to put the option back.
Why hibernate?
Hibernation is kind of a mix between a traditional shut down and sleep
mode primarily designed for laptops. When you tell your PC to hibernate,
it saves the current state of your PC—open programs and documents—to
your hard disk and then turns off your PC. Then when it’s time to start
it up again all your previous work is ready and waiting for you.
Unlike sleep mode, it doesn’t use any power, but it does take longer to start up again.
Setting it up
To add Hibernate to Start > Power, click on the Cortana/search box in the taskbar and type power options. The first result you see should be a Control Panel setting of the same name. Click on that.
Once the Control Panel opens, select Choose what the power buttons do from the left-hand navigation panel.
Then at the top of the next screen click on the link that says Change settings that are currently unavailable.
Now scroll down to the bottom and under Shutdown settings click the checkbox next to Hibernate. Next, click Save changes and you’re done.
Go to Start > Power and you should now see Hibernate among all the rest of the shut-down options.
From time to time you’ll
hear about yet another effort to bring Android to the desktop. Yes,
there’s an official effort to do this straight from Google by bringing
the Play Store to a select number of Chromebooks.
But what if you want this now, or don’t want to buy a new
computer to experience what it’d be like to use Android apps on your PC?
With a little bit of digital elbow grease, it’s possible. You can run
some of your favorite apps and engage in Android gaming by trying out
one of the many third-party solutions. I looked at several software
choices that offer this, and came away with four solid options that will
have you up and running with Android on your Windows PC rather
painlessly.
The best: Remix OS
Remix OS
is my top choice because it’s clearly the had considerable development
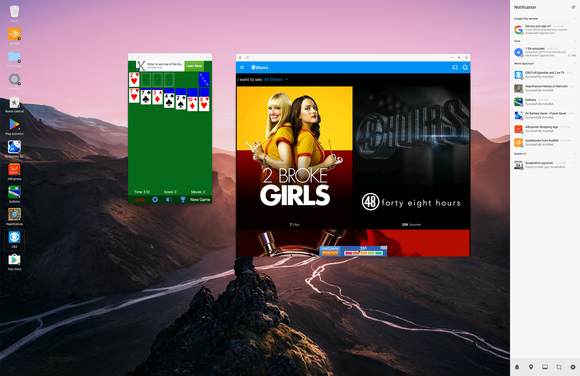
work. It’s a full-blown desktop OS that’s based on Android. Everything
you need to be productive or entertained is there, with the Google Play
Store available and of course the ability to use Google Drive, Gmail,
Chrome, or any non-Google apps for productivity.
The developers have built a slide-out notification menu and
repurposed the software buttons without significantly changing the way
that Android works. I played Clash of Clans, solitaire, and fooled
around in Chrome while trying Remix OS out. It was quite stable and was
the first time I felt that Android had actual capabilities to move
beyond the smartphone or tablet.
It also may sound like a
small matter, but being able to tap into apps like Snapchat that are
currently mobile-only is an appealing part of the experience. It speaks
to how blending the mobile and desktop worlds can mean less time
shifting between devices (with more potential distractions, of course).
However, it’s the most complicated of these software
packages to set up. You need to disable Secure Boot and then choose
Remix from the boot menu in Windows—basically, you're dual-booting. If
you know your way around a PC well enough you’ll be fine, but if this
concept sounds foreign you’ll need to be willing to leap through several
hoops to learn what to do.
Remix is very stable and
runs Android Marshmallow, although I wouldn’t necessarily recommend
using it as your primary PC unless your computing needs are pretty
minimal. And unfortunately touch support didn’t work on my Surface Pro
4, unlike some of the other alternatives that I tried here. However, I
suspect that touch would work with one of the many supported devices. However, I came away impressed at what Jide,
the company behind it, has built here. It’s especially a great option
if you want to do some Android gaming, as it handled numerous titles
very well.
Bluestacks
Available for both Mac and Windows, Bluestacks
has a clear focus on gaming with several titles waiting for you to
download once you fire it up. You go through the typical Android setup
process, Lollipop style. The interface makes clever use of tabs so that
you can keep multiple apps running at once.
There are several
dedicated buttons along the side that emulate features you’d normally do
with a gesture or tap on a mobile device. You’ll find dedicated buttons
for uploading an APK, taking a picture, grabbing screenshots, and
shaking the device (handy for those games or apps where this performs
some type of action).
There is a large list of suggested games, while I was also
able to grab titles like Clash of Clans from the Play Store and get
going without a problem.
Installing other Android apps was handy, as it put favorites
like Google Keep just a click away on the desktop. Snapchat didn’t work
for me, however, giving me an error when I tried to sign in. I found
this to be the case with other apps as well, so your mileage may vary.
Another component of the platform is BlueStacks TV,
which allows you to stream some of your gaming action or view other
live streams that are powered by Twitch. While I’m not a huge fan of the
video game streaming phenomenon, this is as good a way as any to do it
if you want to watch some mobile games in action.
In all the capabilities are pretty impressive, but I did find the performance to be slow and buggy at times.
Amiduos
The Lollipop-powered Amiduos
puts a stock version of Android on your PC, sans the Google Play Store.
It comes preinstalled with Amazon Appstore and has all the sideloading
capabilities of Android so you can install an APK of the Play Store if
you want to get more Google-powered apps on your PC.
But I used this as an opportunity to check out the whole Amazon Underground
scene. You get a ton of paid apps for free, although you have to
download and update them through Amazon’s store instead of Google’s.
Amiduos also gives you have a more
traditional Android experience. I also found it to be the most
responsive version of Android to work with the touch screen on my
Surface. It’s still not as hyper responsive as something like a Pixel C
or an iPad, but it was neat that this experience could be hacked
together.
Otherwise, you’ll need to
rely on mouse clicks and drags to work through the interface, which is
pretty close to a stock build of Lollipop. It was a pretty solid setup
on my Surface Pro 4, though it did use enough processor power to keep
the fan running whenever it was on (I have 8GB of RAM and an i5
processor).
In all operation was smooth, however, and didn’t require a huge learning curve.
Andy
Andy has its merits,
but I took issue with some elements of the experience. The platform is
loaded with ads and tries to install a Chrome extension that changes
your default search page in Chrome. This happened even though I clicked
the box to decline this feature. Not cool.
It does handle much of Android well,
especially when playing Android games. The build is based on
Marshmallow, and it was quite responsive to touches on my Surface. The
stock build was easy to navigate, although you need to sideload the Play
Store as this also instead comes preinstalled with the Amazon Appstore.
It’s a pretty good option
for gaming and was rather easy to use. But keep an eye for all of those
unwanted “extras” that are baked in.
The future of Android
If nothing else, this exercise made me excited for what
it’ll be like to have Android apps on Chromebooks. There are already
some good apps and games
out there for those Chromebooks that are capable of running the Google
Play Store. You can peer down the road and see that Android can be
useful on a desktop, though it’s still going to take some work to make
it something that I’d want to use everyday.
Many Windows 7 users are faced with an unpleasant glitch that causes the disappearance of the language bar from the taskbar, and the standard tools of the system fail to restore the layout indicator. In this case, a minor intervention into the registry can help. See the video in youtube
Microsoft’s Anniversary Update for Windows 10
wouldn’t be complete if there weren’t a few annoyances added to great
features like Cortana integration and an improved Action Center. One
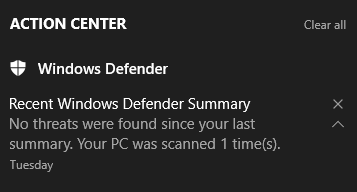
such annoyance is Windows Defender's unceasing penchant for telling you what a great job it’s doing.
The new feature is called enhanced
notifications, which amounts to Microsoft’s built-in antivirus software
reporting the results of its scans.
If you don’t mind the regular reports then it’s a great feature.
But if you really don’t see the point of such micro-monitoring there’s an easy way to turn it off.
Open the Settings app by going to Start > Settings > Update & security > Windows Defender.
Then, in the main part of the screen, scroll down until you see the Enhanced notifications section. Then simply flip the on/off slider to Off.
That’s it. Enhanced notifications are turned off. If Windows Defender
finds a threat to your PC you will still be notified. What you won’t
see, however, are notifications whenever Defender completes a scan or
any other routine activity.
Anyone managing a multi-user PC at home might want to keep these
notifications active so they don’t have to open Defender very often just
to see what it’s up to. For me, turning off Defender’s enhanced
notifications was an easy way to reduce the number of alerts that
already flood my PC without losing any mission-critical updates.
![[ Plzhow ] Written and illustrated explanations](https://blogger.googleusercontent.com/img/b/R29vZ2xl/AVvXsEi0wb8SWgzkXTHmz2gI0D9wCA-XZK1GxFwT6EzfZ4IK3a2FV7eeIugnYcjwxYt4T6XtGc9mp52i63BfQjK94ow8tti1VyCEMMjBbYr8JZDgz8AUdopwlkfUDU1Ln9jQKAOSgf6qXxMNWNo/s1600/ff.png)