Showing posts with label Windows. Show all posts

How to add a Hibernate option to the Windows 10 Start menu


At the end of every day do you still dutifully close every file and program window before shutting down your PC? That’s the standard way to handle things, but for quite a few versions of Windows, Microsoft also offered the ability to use Sleep and Hibernate modes instead of just a regular shut down.
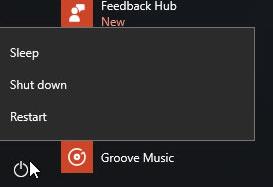
In Windows 10, however, Microsoft decided not to include hibernate with the rest of the shut down options under Start > Power by default. The good news is it’s easy to put the option back.

Why hibernate?

 Hibernation is kind of a mix between a traditional shut down and sleep mode primarily designed for laptops. When you tell your PC to hibernate, it saves the current state of your PC—open programs and documents—to your hard disk and then turns off your PC. Then when it’s time to start it up again all your previous work is ready and waiting for you.
Unlike sleep mode, it doesn’t use any power, but it does take longer to start up again.

Setting it up 

To add Hibernate to Start > Power, click on the Cortana/search box in the taskbar and type power options. The first result you see should be a Control Panel setting of the same name. Click on that.


Once the Control Panel opens, select Choose what the power buttons do from the left-hand navigation panel.


Then at the top of the next screen click on the link that says Change settings that are currently unavailable.


Now scroll down to the bottom and under Shutdown settings click the checkbox next to Hibernate. Next, click Save changes and you’re done.
 Go to Start > Power and you should now see Hibernate among all the rest of the shut-down options.

The best programs to run Android apps on your Windows PC


From time to time you’ll hear about yet another effort to bring Android to the desktop. Yes, there’s an official effort to do this straight from Google by bringing the Play Store to a select number of Chromebooks.
But what if you want this now, or don’t want to buy a new computer to experience what it’d be like to use Android apps on your PC? With a little bit of digital elbow grease, it’s possible. You can run some of your favorite apps and engage in Android gaming by trying out one of the many third-party solutions. I looked at several software choices that offer this, and came away with four solid options that will have you up and running with Android on your Windows PC rather painlessly.


The best: Remix OS


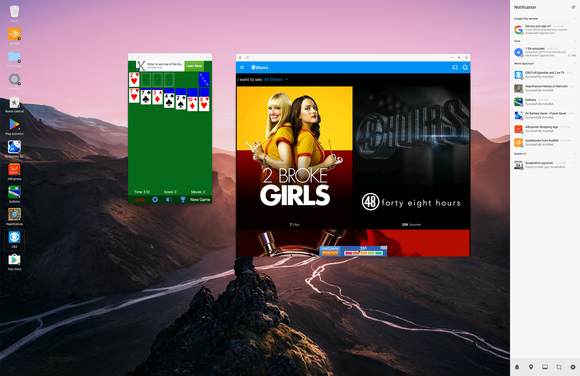
Remix OS is my top choice because it’s clearly the had considerable development work. It’s a full-blown desktop OS that’s based on Android. Everything you need to be productive or entertained is there, with the Google Play Store available and of course the ability to use Google Drive, Gmail, Chrome, or any non-Google apps for productivity.
The developers have built a slide-out notification menu and repurposed the software buttons without significantly changing the way that Android works. I played Clash of Clans, solitaire, and fooled around in Chrome while trying Remix OS out. It was quite stable and was the first time I felt that Android had actual capabilities to move beyond the smartphone or tablet.


It also may sound like a small matter, but being able to tap into apps like Snapchat that are currently mobile-only is an appealing part of the experience. It speaks to how blending the mobile and desktop worlds can mean less time shifting between devices (with more potential distractions, of course).
However, it’s the most complicated of these software packages to set up. You need to disable Secure Boot and then choose Remix from the boot menu in Windows—basically, you're dual-booting. If you know your way around a PC well enough you’ll be fine, but if this concept sounds foreign you’ll need to be willing to leap through several hoops to learn what to do.


Remix is very stable and runs Android Marshmallow, although I wouldn’t necessarily recommend using it as your primary PC unless your computing needs are pretty minimal. And unfortunately touch support didn’t work on my Surface Pro 4, unlike some of the other alternatives that I tried here. However, I suspect that touch would work with one of the many supported devices. However, I came away impressed at what Jide, the company behind it, has built here. It’s especially a great option if you want to do some Android gaming, as it handled numerous titles very well.


Bluestacks


Available for both Mac and Windows, Bluestacks has a clear focus on gaming with several titles waiting for you to download once you fire it up. You go through the typical Android setup process, Lollipop style. The interface makes clever use of tabs so that you can keep multiple apps running at once.


There are several dedicated buttons along the side that emulate features you’d normally do with a gesture or tap on a mobile device. You’ll find dedicated buttons for  uploading an APK, taking a picture, grabbing screenshots, and shaking the device (handy for those games or apps where this performs some type of action).
There is a large list of suggested games, while I was also able to grab titles like Clash of Clans from the Play Store and get going without a problem.
Installing other Android apps was handy, as it put favorites like Google Keep just a click away on the desktop. Snapchat didn’t work for me, however, giving me an error when I tried to sign in. I found this to be the case with other apps as well, so your mileage may vary.


Another component of the platform is BlueStacks TV, which allows you to stream some of your gaming action or view other live streams that are powered by Twitch. While I’m not a huge fan of the video game streaming phenomenon, this is as good a way as any to do it if you want to watch some mobile games in action.
In all the capabilities are pretty impressive, but I did find the performance to be slow and buggy at times.


Amiduos


The Lollipop-powered Amiduos puts a stock version of Android on your PC, sans the Google Play Store. It comes preinstalled with Amazon Appstore and has all the sideloading capabilities of Android so you can install an APK of the Play Store if you want to get more Google-powered apps on your PC.
But I used this as an opportunity to check out the whole Amazon Underground scene. You get a ton of paid apps for free, although you have to download and update them through Amazon’s store instead of Google’s.


Amiduos also gives you have a more traditional Android experience. I also found it to be the most responsive version of Android to work with the touch screen on my Surface. It’s still not as hyper responsive as something like a Pixel C or an iPad, but it was neat that this experience could be hacked together.


Otherwise, you’ll need to rely on mouse clicks and drags to work through the interface, which is pretty close to a stock build of Lollipop. It was a pretty solid setup on my Surface Pro 4, though it did use enough processor power to keep the fan running whenever it was on (I have 8GB of RAM and an i5 processor).
In all operation was smooth, however, and didn’t require a huge learning curve.


Andy


Andy has its merits, but I took issue with some elements of the experience. The platform is loaded with ads and tries to install a Chrome extension that changes your default search page in Chrome. This happened even though I clicked the box to decline this feature. Not cool.


It does handle much of Android well, especially when playing Android games. The build is based on Marshmallow, and it was quite responsive to touches on my Surface. The stock build was easy to navigate, although you need to sideload the Play Store as this also instead comes preinstalled with the Amazon Appstore.


It’s a pretty good option for gaming and was rather easy to use. But keep an eye for all of those unwanted “extras” that are baked in.


The future of Android


If nothing else, this exercise made me excited for what it’ll be like to have Android apps on Chromebooks. There are already some good apps and games out there for those Chromebooks that are capable of running the Google Play Store. You can peer down the road and see that Android can be useful on a desktop, though it’s still going to take some work to make it something that I’d want to use everyday.


How to solve probleme of hidden language bar in taskbar


Many Windows 7 users are faced with an unpleasant glitch that causes the disappearance of the language bar from the taskbar, and the standard tools of the system fail to restore the layout indicator. In this case, a minor intervention into the registry can help.
See the video in youtube


How to turn off Windows Defender's enhanced notifications in Windows 10


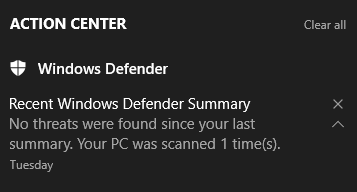
Microsoft’s Anniversary Update for Windows 10 wouldn’t be complete if there weren’t a few annoyances added to great features like Cortana integration and an improved Action Center. One such annoyance is Windows Defender's unceasing penchant for telling you what a great job it’s doing.


The new feature is called enhanced notifications, which amounts to Microsoft’s built-in antivirus software reporting the results of its scans.
If you don’t mind the regular reports then it’s a great feature.
But if you really don’t see the point of such micro-monitoring there’s an easy way to turn it off.
Open the Settings app by going to Start > Settings > Update & security > Windows Defender.


Then, in the main part of the screen, scroll down until you see the Enhanced notifications section. Then simply flip the on/off slider to Off.
That’s it. Enhanced notifications are turned off. If Windows Defender finds a threat to your PC you will still be notified. What you won’t see, however, are notifications whenever Defender completes a scan or any other routine activity.
Anyone managing a multi-user PC at home might want to keep these notifications active so they don’t have to open Defender very often just to see what it’s up to. For me, turning off Defender’s enhanced notifications was an easy way to reduce the number of alerts that already flood my PC without losing any mission-critical updates.

What to do when you hate Windows 10


I usually start this column with “so and so needed something done to their PC,” but if I were to include the names of all the people who have written me about how unhappy they are with their Windows 10 “upgrade” the file would be so large the server that hosts this page would need a new hard drive. I’ve been inundated with unhappy Windows 10 users for the past two months, and my heart goes out to these folks. A lot of them were upgraded unsuspectingly, and Microsoft deserves a ton of scorn for its malware-like Windows 10 upgrade tactics. That said, now that you have Windows 10 on your PC and you’re not happy, here’s what you can do about it.

1. Keep it, but make some changes

I know this is probably not what you want to hear, but overall I don’t think Windows 10 is a bad OS like Windows 8 was when it launched. It’s essentially a hybrid version of Windows 7 and Windows 8.1, and it’s going to be around for a very long time in one form or another so you might as well get comfortable with it now. It also offers a lot of tweaks that could help it grow on you. Here are some of my favorites:
Enable Dark Mode
Muzzle Cortana
Customize the Start Menu
Enable tracking for your laptop
Disable Quick Access in File Explorer
Use virtual desktops
Tweak your desktop colors
Snap your windows


And that’s just scratching the surface. For a ton more tips check here,here, and here.

2. Go back to your old OS, aka the Nuclear Option

If you have a copy of your OS on disc or digital media, you can always just nuke and pave, as we say. That means you will wipe the hard drive and reinstall the OS from scratch. We generally don’t recommend it, however, because it’s a huge hassle. If your data files such as music, documents, pictures and such are on the same partition as your OS you’ll need to back up everything first, reinstall your OS from scratch, them migrate everything back. Now, if you followed our previous advice about keeping your OS and data on separate partitions you're in better shape, and situations like this is exactly why we deploy this strategy. You can reinstall your OS without touching any of your precious data.

3. Restore from Factory OS partition

This one is tricky. Say you have a PC from a company such as Dell, Lenovo, or HP. They will typically ship the PC with a recovery partition, meaning an image of the system as it left the factory is stored on a small partition, and you can restore the PC to that factory condition by using a built-in utility that you launch at boot. I have not been able to test this, but if that partition is for Windows 7 or 8, it seems that installing Windows 10 might render that “old” partition unusable. In this forum thread, the moderator states, “If you upgrade using Windows Update or the .ISO media, your recovery partition will become inoperable.” Therefore, if you have a Windows 7 or 8 recovery partition, be sure to create recovery media before the upgrade, just in case. If you have physical media that came with your PC you can also use that. 

4. Isn’t there an easier way to go back to my old OS?

Not anymore, there isn’t. There was a period during the “free upgrade” era when Microsoft allowed people to try Windows 10 for 31 days and go back if they were unhappy, but that window has closed. So for now you’re stuck with it.

How to Manage the Start Menu in the Windows 10 Anniversary Update


Microsoft launched the Windows 10 Anniversary Update on Aug. 2 with a host of new features and enhancements, including a refurbished Start menu. So what changes did Microsoft make to the menu, and how do you now navigate and control it?

Install the Anniversary Update for Windows 10, click on the Start button, and you'll notice that the Start menu looks a bit different. The changes aren't dramatic, but knowing how to maneuver and manage the new Start menu will make the adjustments easier to swallow.
First, if you don't already have the Anniversary Update, you can easily install it one of two ways. Follow the steps in this Microsoft blog post to install it from Windows Update or from a dedicated Anniversary Update support page. After the update is entrenched on your PC, click on the Start button.
First, you'll see there's no longer an All Apps icon that you have to click on or tap to view all your installed apps. Instead, all you have to do it scroll down the left pane of the Start menu, and all your apps appear alphabetically.


 Second, you'll observe that the icons for various features no longer display their names, forcing you to figure out what each one does. Happily, that's not too hard. Simply hover your mouse over or hold down your finger (assuming your device sports a touch screen) on each icon that appears on the left side of the menu. Windows displays a tooltip that reveals the name of the icon, such as Power, Settings, or your account name.


To access the options available for a certain icon, click or tap on it. For example, click or tap on the Power button, and you'll uncover at least two options: Shut down and Restart. If you're using a laptop, other options will appear, including Sleep and Hibernate.


Click on the Settings icon, and the Windows 10 Settings menu pops up.
Click on the icon for your account name, and three options spring up: Change account settings, Lock, and Sign out. The first option displays your account screen in Settings. The second option throws you back to the Windows 10 Lock screen. And the third option signs you out so another person can log into Windows.

 Want to peek at the names of the icons without having to hover over each one? Easy enough. Click on the Expand icon (the one with three horizonal lines) at the top of the pane, and the names for each icon are brought to light.


Click on the Expand icon again, and the pane returns to its condensed view.
By default, the Windows 10 Start menu shows you icons for Power, Settings, and your account. But you can add more icons to the pane so your favorite features are more easily accessible. This option is available whether or not you've installed the Anniversary Update.
Click on the Start button and then click on the Settings icon. At the Settings window, click on the category for Personalization. On the left pane of the Personalization window, click on the setting for Start. Scroll down to the bottom of the right pane and click on the link for Choose which folders appear on Start.


You can now select the folders that you want to access from the Start menu, such as File Explorer, Documents, Downloads, Music, and Pictures.


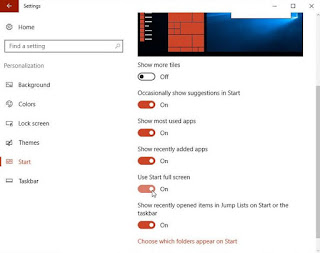
There are more ways to tweak the Start menu with or without the Anniversary Update. Click on the Start button and then click on the Settings icon. At the Settings window, click on the category for Personalization. On the left pane of the Personalization window, click on the setting for Start.
On the right pane, you'll see options to show suggested apps in the Start menu, show most used apps, show recently added apps, and even transform the Start menu into the Start screen.

How to repair Windows' master boot record and fix your bricked PC


A nasty new form of ransomware is wreaking havoc on computers. Hackers that encrypt your files and demand money from you in the form of bitcoin is bad enough, but a few versions also overwrite your Windows PC’s master boot record (MBR).
The master boot record is a key part of your PC’s startup system. It contains information about the computer’s disk partitions and helps load the operating system. Without a properly functioning MBR, your PC simply won’t work.
Ransomware that overwrites the MBR isn’t all that new, with examples of it dating back to at least 2012. More recently, the Petya variant of ransomware has been causing MBR problems. Then in August, a pesky bit of malware popped up on FossHub that overwrote the MBR, which caused headaches for affected users. And the master boot record can sometimes be damaged via less hostile actions, as well.
Luckily, destroying the MBR usually isn’t irreversible. But it’s still problematic since overwriting the MBR renders your PC inoperative until it’s repaired. On top of that, the method for fixing it is far from obvious.
Here’s how to make everything right if your master boot record was erased.

How to fix the MBR

The main way to fix the MBR is to use a command prompt and run the bootrec.exe command. In versions of Windows prior to Windows 8 and 10, you usually accessed the command prompt through recovery media like a DVD disc or USB drive. That still works in Windows 10, and we’ll discuss that method at the end of this tutorial. But the latest versions of Windows offer an easier method for running recovery commands without external media.


When you first boot up a Windows 10 PC it should recognize that there’s a problem and enter “automatic repair” mode. When it does, you’ll see the words "Preparing Automatic Repair” appear below the blue Windows logo.
If that doesn’t happen, but you do see the blue Windows logo, turn off your computer using the hard reset/power button. Keep turning the computer on and off until you see your PC booting into automatic repair. It should only take a few reboots.


nce automatic repair mode is ready, you’ll see the Automatic Repair screen. From here select Advanced options.


On the next screen, click Troubleshoot and then Advanced options once again.

 
You’ll see a screen with six options. If you want, you can select Startup Repair before turning to the command prompt and Bootrec. Startup Repair is an automated program that will try to fix any problems it finds on the computer disk without any intervention from the user.
It’s a good utility that may fix your problem, but Startup Repair will take far more time to complete its task than simply running Bootrec.
To use the Bootrec option, click the Command Prompt tile. This may prompt your computer to reboot yet again and then ask you to login with your password. If that happens, do so.
Once the command line appears, all you have to do is type the following, then press Enter:
bootrec.exe /fixmbr
Note the space between “exe” and “/fixmbr”—it’s critical to include this space for the command to run properly. The first part tells the PC to run the Bootrec program, while the “/fixmbr” option tells Bootrec exactly what we want it to recover.


If all goes well, the command prompt should print out, “The operation completed successfully.” When you see that you can reboot your PC.
If you’re trying to recover from ransomware or some other form of malware, be sure to boot into Safe Mode and then run an antimalware program. For more details on these steps, check out our earlier tutorials on how to remove malware from a Windows PC and how to boot into Safe Mode in Windows 10.

Bootrec from a system repair drive

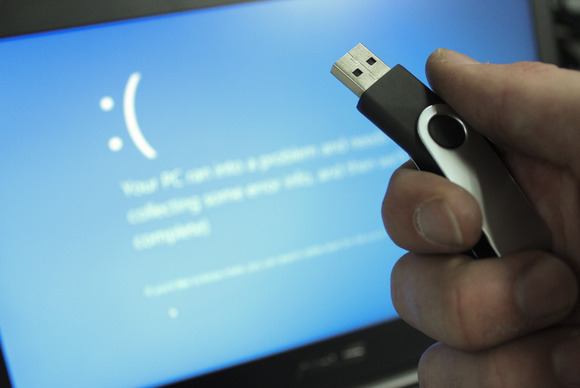
If you’re running an older version of Windows, or if your Windows 10 PC isn’t launching the repair options, you’ll need to use a recovery drive to fix your MBR. Start by inserting the system repair media into the PC. This will be either one you created, or a purchased version of the Windows install discs. 


Creating a recovery drive for Windows will give you peace of mind in case the worst happens. 
Next, boot your system. If you’re using a USB drive, your system’s BIOS needs to be set to boot from USB before falling back to any internal drives. If you don’t have your BIOS correctly configured, the system recovery drive will be of no use. Adding to the complication, the way you enter the BIOS (and how you set it up) is not universal. Lincoln Spector has a tutorial on how to handle setting up your BIOS to boot from USB.
Once you’ve booted into the recovery drive, you should be asked to select a keyboard layout in your language—US English in this case. Next, you’ll land on the troubleshooting screen we saw earlier.
At this point you can continue to the command prompt as we discussed earlier and run Bootrec.
If you’re on Windows 7, you’ll need to follow slightly different steps once you launch into the recovery mode. After you’ve selected the input method, select Repair your computer, followed by the operating system name. Then click Next > System Recovery Options > Command Prompt and start Bootrec using the same bootrec.exe /fixmbr as above.

Next steps

Although the MBR problem is relatively easy to repair, it’s still best to be prepared for the worst in case this problem ever strikes again. 


The most important thing you can do to protect against MBR erasure and most other catastrophic PC malfunctions: Back up your personal files. That means keeping a local daily backup on an external hard drive or using a third-party program for daily backups. It’s also a good idea to have a secondary backup that lives offsite, such as an online backup service like Backblaze, Carbon, or CrashPlan. PCWorld’s guide to backing up your PC for free can help you out.
You’ll also want to create a system recovery drive. This is an especially important measure in the age of Windows 10, since many early Windows 10 users upgraded to the new operating system via a digital download—and thus don’t have a physical copy of the operating system. If the automatic repair method ever fails, you’ll need a system repair drive in order to use Bootrec or any other system recovery tools.
Check out our earlier tutorial to learn how to create a system recovery drive, and the important information Microsoft won’t tell you about recovery drives.  


Microsoft fixes Windows 10's Anniversary Update freezing


Windows 10’s Anniversary Update is having its share of problems, but Microsoft has solved at least one of them.
The company announced late Wednesday that it had released a patch to fix the login freeze issue. Anyone who was experiencing the issue can now upgrade to the latest version of Windows 10. The patch fixing the bug will be automatically applied when you move up to the Anniversary Update.
The story behind the story: The login freeze issue was the first of three hardware problems that have dogged the Anniversary Update. Shortly after reports of the login issue appeared, a bug causing webcams to fail in the Anniversary Update surfaced. About a week later, we started hearing about Amazon Kindle users whose PCs were crashing when they plugged their e-readers into their computers via USB.


Thawed out

While there have been several problems with the Anniversary Update, the freezing issue was easily the most severe. When it was first discovered in mid-August, the best thing users could do to solve the issue was roll back their PCs to an earlier version of Windows 10.
Users experienced the freezing issue when they used two drives, putting their operating system on the primary drive and splitting app data onto a second drive, according to a post by Microsoft on the company’s forums.
If you never bothered to roll back from the Anniversary Update and are still experiencing the freezing issue, Microsoft has a workaround. If you have a second administrator account, sign in to that account, check Windows Updates for any updates, and install the patchreleased on August 31. Many users should already have a notice that a new update is ready for installation.
Once that’s done, reboot your PC and you should be able to login to your original account with no problems. If it doesn't, you can roll back your PC to vanilla Windows 10 and reinstall the Anniversary Update once again. 

How to Use a Dark Theme for (Almost) Everything in Windows 10

How to Use a Dark Theme for (Almost) Everything in Windows 10


With Windows 10’s Anniversary Update, Microsoft now offers a dark theme–known as “dark mode”. This option was previously hidden and could only be enabled with a registry hack. Now, it’s a simple toggle.

There’s just one catch: it doesn’t apply to every Windows application. But we’ve got you covered. Here’s how to get your whole desktop (or as much as possible) looking dark.

Enable Dark Mode for Windows 10 Settings and Apps

To enable the new dark theme, head to Settings > Personalization > Colors. Scroll down and select “Dark” under “Choose your app mode”.

The Settings application itself will immediately turn dark, as will many other “Universal Windows Platform” applications. However, it’s up to each developer to support the dark theme, and some applications will continue using their normal colors.

This option also doesn’t affect desktop applications, including Windows 10’s File Explorer, which will remain white.


Enable the Dark Theme in Microsoft Edge

The MIcrosoft Edge web browser included with Windows 10 also has a dark theme. However, its dark theme option is entirely separate from the main option in Settings…for some reason.

To activate a dark theme in Edge, open the Microsoft Edge web browser, open the menu, and select “Settings”. Select “Dark” under “Choose a theme”.

You can also choose to set your theme separately in the Groove music player and Movies & TV video player apps. However, they’ll just use your system theme setting by default. You don’t have to change the setting manually, as you do with Edge.

Enable the Dark Theme in Microsoft Office

Microsoft Office 2016 also contains a dark theme that isn’t enabled by default, and must be manually enabled.

To enable it, open an Office application like Word or Excel and head to File > Options. On the General tab, click the “Office Theme” box under “Personalize your copy of Microsoft Office” and select the “Black” office theme.

Your theme choice will apply to all Office applications. So, if you set this option in Word and later open Excel, Excel will also be using a dark theme.


Install Dark Themes for Chrome, Firefox, and Other Applications

Many other Windows desktop applications have their own theming options and theming engines. For example, to use a dark theme in Google Chrome, you’ll need to head to Google’s Chrome themes site and install a dark theme. For Firefox, you’ll need to head to Mozilla’s Firefox themes site and install a dark theme.
For example, we installed the Morpheon Dark theme for Chrome. It makes Chrome look much more at home on a dark-themed desktop.
Check to see whether the applications you frequently use offer their own theme options.


Enable a Dark Theme for Windows Desktop Applications

The real problem with the new “dark mode” setting is that it doesn’t affect the Windows desktop theme at all. Desktop applications like File Explorer will continue using the normal, light theme.
Windows does have a built-in dark theme for desktop applications, but it probably isn’t ideal. To enable it, open the Control Panel and head to Appearance and Personalization > Change the Theme. Scroll down and choose one of the High Contrast themes, such as “High Contrast Black”.


This will make applications like File Explorer have a dark background. However, they won’t look all that great–high contrast themes are an accessibility feature designed to increase contrast so the screen is easier to read and understand. They don’t look as slick as a modern dark theme would.


If you want a slicker dark theme for File Explorer and other desktop applications, you’ll have to go a bit off the beaten path. You’ll need to bypass the normal protection against using third-party themes–or “visual styles”– in Windows. You can then hunt down a third-party dark theme you like. Follow our guide to installing third-party visual styles on Windows for more help.
For example, we installed UxStyle and the Windows 10 – Dark Edition visual style. There are many other dark themes you could choose. A theme like this one makes File Explorer and other applications look darker and fit in better, although there are still parts of Windows desktop applications that themes don’t (and can’t) modify. Just make sure you back up before installing something like this, as you’re messing with system files.


Like many parts of Windows 10, the new dark theme–or dark “app mode”–feels incomplete. Microsoft could include a dark theme option for Windows desktop applications and the interface would look more cohesive. Perhaps Microsoft plans on replacing File Explorer with a new, Universal Windows Platform-based file manager in a future update to Windows 10. For now, though, this is what we’ve got.

Quick Ways to Speed Up a Slow Windows PC


Quick Ways to Speed Up a Slow Windows PC 


Today all usere use latest version in windows .They are looking for strength, quality and speed in 

performance but recently problemes in the system which emerged spasm.....

But with this video I hope that these problems go away :D


I hope you enjoy Thank you 


How to Stop Windows 10 Automatic Updates

How to Stop Windows 10 Automatic Updates  


Are you bothering system updates in Windows 10 ?


From now on to you the best solutions to overcome this difficult problem

 Watch the video in youtube and plz don't forget subscribe in our channel

  Thank you for watching ;)

How to install windows or lunix in computer using mobile phone


Hello friends , I hope you are fine , today i want to show you new methode fo install system lunix , window.... in computer using mobile phone 


First you need install DriveDroid in your mobile phone 
And connecte her with your computer using cable
 Notice : DriveDroid need to root
install this app to rooting your phone IROOT

To use Drivedroid you can allow access root 


 After click to boutton + 


 After that you can download any systeme in iso 


in final you can see downloaded iso in menu and click it 

 Thank you for watching this article