![[ Plzhow ] Written and illustrated explanations](https://blogger.googleusercontent.com/img/b/R29vZ2xl/AVvXsEi0wb8SWgzkXTHmz2gI0D9wCA-XZK1GxFwT6EzfZ4IK3a2FV7eeIugnYcjwxYt4T6XtGc9mp52i63BfQjK94ow8tti1VyCEMMjBbYr8JZDgz8AUdopwlkfUDU1Ln9jQKAOSgf6qXxMNWNo/s1600/ff.png)

Microsoft launched the Windows 10 Anniversary Update on Aug. 2 with a host of new features and enhancements,
including a refurbished Start menu. So what changes did Microsoft make
to the menu, and how do you now navigate and control it?
Install the Anniversary Update for Windows 10, click on the Start
button, and you'll notice that the Start menu looks a bit different. The
changes aren't dramatic, but knowing how to maneuver and manage the new
Start menu will make the adjustments easier to swallow.
First, if you don't already have the Anniversary Update, you can easily install it one of two ways. Follow the steps in this Microsoft blog post to install it from Windows Update or from a dedicated Anniversary Update support page. After the update is entrenched on your PC, click on the Start button.
First, you'll see there's no longer an All Apps icon that you have to
click on or tap to view all your installed apps. Instead, all you have
to do it scroll down the left pane of the Start menu, and all your apps
appear alphabetically.

Second, you'll observe that the icons for various features no longer
display their names, forcing you to figure out what each one does.
Happily, that's not too hard. Simply hover your mouse over or hold down
your finger (assuming your device sports a touch screen) on each icon
that appears on the left side of the menu. Windows displays a tooltip
that reveals the name of the icon, such as Power, Settings, or your
account name.

To access the options available for a certain icon, click or tap on it.
For example, click or tap on the Power button, and you'll uncover at
least two options: Shut down and Restart. If you're using a laptop,
other options will appear, including Sleep and Hibernate.

Click on the Settings icon, and the Windows 10 Settings menu pops up.
Click on the icon for your account name, and three options spring up:
Change account settings, Lock, and Sign out. The first option displays
your account screen in Settings. The second option throws you back to
the Windows 10 Lock screen. And the third option signs you out so
another person can log into Windows.

Want to peek at the names of the icons without having to hover over each
one? Easy enough. Click on the Expand icon (the one with three
horizonal lines) at the top of the pane, and the names for each icon are
brought to light.

Click on the Expand icon again, and the pane returns to its condensed view.
By default, the Windows 10 Start menu shows you icons for Power,
Settings, and your account. But you can add more icons to the pane so
your favorite features are more easily accessible. This option is
available whether or not you've installed the Anniversary Update.
Click on the Start button and then click on the Settings icon. At the
Settings window, click on the category for Personalization. On the left
pane of the Personalization window, click on the setting for Start.
Scroll down to the bottom of the right pane and click on the link for Choose which folders appear on Start.

You can now select the folders that you want to access from the Start
menu, such as File Explorer, Documents, Downloads, Music, and Pictures.

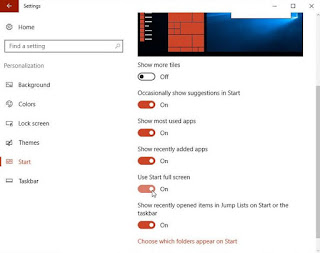
There are more ways to tweak the Start menu with or without the
Anniversary Update. Click on the Start button and then click on the
Settings icon. At the Settings window, click on the category for
Personalization. On the left pane of the Personalization window, click
on the setting for Start.
On the right pane, you'll see options to show suggested apps in the
Start menu, show most used apps, show recently added apps, and even
transform the Start menu into the Start screen.

EmoticonEmoticon